Running HTTPS on localhost
Quick note before you dive in!
This article shows the way of creating your own SSL certificate for local use. It works… but it’s a bit of a hassle.
If you’d rather skip the copy-paste-and-curse routine, check out Novus — a handy local HTTPS proxy for macOS. It sets up HTTPS with custom domains in minutes, so you can get straight to building cool stuff instead of fighting certificates.
The majority of websites nowadays are already using HTTPS. Security is very important in today’s world of the internet where you can buy stuff online, check your bank account, communicate with people, or just enjoy watching a movie. In each of these situations, it’s crucial that your data is encrypted and safely transferred across the internet so only your browser and the server can read the data without any 3rd party being able to intercept it along the way.
HTTPS helps to achieve this by using asymmetric cryptography which encrypts all information exchanged between the client and the server. This is done by generating a so-called digital certificate which is subsequently stored on the application server. Every client that wants to visit such a website, reads the certificate first and creates a TLS handshake between them and the server. This way a secure connection is assured.
These certificates are issued by certificate authorities (CA) which are public organizations trusted by both owner of the certificate and the other party relying on it. They store, sign, and issue digital certificates. CAs verify the ownership of a website and then issue a certificate. This way whenever you see a padlock in your browser address bar, you can rest assured knowing that you’re actually seeing the original website instead of a tampered version.
Self-signed certificates are the exact opposite - they are generated by users themselves and can be created for free by using tools like OpenSSL. These can be useful in internal networks or test environments while developing an app. However, such certificates shouldn’t be used in production (internet) environments as they are not signed by trusted authorities and thus not recognized by browsers.
Generate an SSL certificate for localhost
As localhost doesn’t belong to anyone (in terms of domain ownership) and it’s not publicly accessible on the internet, public CAs cannot issue a certificate for it, as described in this article by Let’s Encrypt. One way to solve this issue would be to have a real domain that would point to 127.0.0.1. There is an already existing website that does exactly that → readme.localtest.me.
Another option would be to generate the above-mentioned self-signed SSL certificate. This is what we are going to do in this article.
As we already learned, we can generate a self-signed certificate using an openssl utility. But before that, we need to specify some necessary details about the certificate for SAN. Without that some browsers could reject opening a website.
# ./localhost.ext

[dn]
CN=localhost

[req]
distinguished_name = dn

[EXT]
subjectAltName=DNS:localhost
keyUsage=digitalSignature
extendedKeyUsage=serverAuth
The actual command will then look like this:
openssl req -x509 \
  -out ./certs/cert.pem -keyout ./certs/cert.key \
  -newkey rsa:2048 -nodes -sha256 \
  -subj '/CN=localhost' -extensions EXT \
  -config <(cat ./localhost.ext)
Create a demo Node.js app
Now that we have the certificate ready, we need an app that we want to run on HTTPS. We will create a simple HTTP server written in Node.js that listens on port 3000 and returns a text message.
// main.js

const http = require('http')

const server = http.createServer((req, res) => {
  res.writeHead(200)
  res.end('Hello World!')
})

server.listen(3000)
console.log('Listening on 127.0.0.1:3000')
You can check the response by running node main.js and opening localhost:3000 in your browser.
After checking that the code is working we can finally configure Nginx which will be used as a server for our app and will also take care of handling SSL. Theoretically, we don’t need Nginx as we could handle SSL termination in the app itself but since it’s a CPU-intensive task, it is s a good practice to offload this to a proper web server which also comes with other benefits.
Configure Nginx
First, we need to install Nginx. The easiest way to do so is by using Docker. Here is a very simple Dockerfile that we’ll use to launch the server.
FROM nginx:1.21-alpine

COPY ./ssl.conf /etc/nginx/conf.d/ssl.conf
COPY ./sites.conf /etc/nginx/conf.d/default.conf

EXPOSE 3000
Before building the image, we have to create two files. In the first file - sites.conf we are going to configure the server behaviour. In our case, we just want to listen on port 443 (the default port for HTTPS) and we want to forward all incoming traffic to localhost:3000.
Since we’re using Docker to run Nginx, we have to use the special URL to address the computer’s (host) port instead of the one inside the container. Therefore we set http://host.docker.internal instead of http://localhost.
# sites.conf
server {
    listen  443 ssl;
    include /etc/nginx/conf.d/ssl.conf;

    location / {
        proxy_pass       http://host.docker.internal:3000;
        proxy_set_header Host $host;
        proxy_set_header X-Real-IP $remote_addr;
        proxy_set_header X-Forwarded-For $proxy_add_x_forwarded_for;
        proxy_set_header X-Forwarded-Proto $scheme;
    }
}
In the other file - ssl.conf, we just configure some SSL details.
# ssl.conf
ssl_certificate                 /etc/nginx/ssl/cert.pem;
ssl_certificate_key             /etc/nginx/ssl/cert.key;

ssl_session_cache               shared:SSL:20m;
ssl_session_timeout             10m;
ssl_prefer_server_ciphers       on;
ssl_protocols                   TLSv1 TLSv1.1 TLSv1.2;
ssl_ciphers                     ECDH+AESGCM:DH+AESGCM:ECDH+AES256:DH+AES256:ECDH+AES128:DH+AES:ECDH+3DES:DH+3DES:RSA+AESGCM:RSA+AES:RSA+3DES:!aNULL:!MD5:!DSS;

add_header                      Strict-Transport-Security "max-age=31536000";
Once we have the configuration ready, we can build the Docker image by calling
docker build -t ssl-proxy . When the build finishes, we can run the container. Make sure your node app is running!
docker run -v "$(PWD)/certs:/etc/nginx/ssl" ssl-proxyIf everything worked, you can now go to https://localhost and after confirming the HTTPS certificate warning dialog in the browser you should see your Hello World message.
Specify a custom DNS name
Now that we have it all working you might be thinking “hey, this is cool, but what if I don’t want localhost? is there any way I could specify a custom domain?”. I’m glad you asked! To make it work with a custom domain name, we have to configure DNS. We could either install some local DNS server or edit the special file called /etc/hosts. In this file, you can specify all custom domains and the IP address they should resolve to.
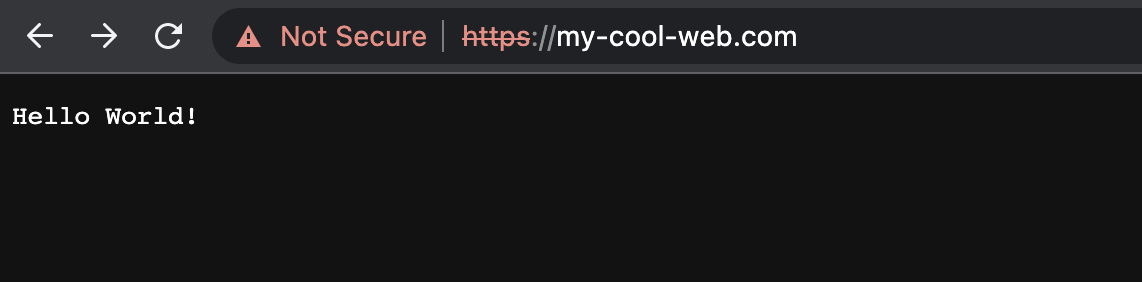
Let’s say we want to access our web at the address https://my-cool-web.com. This address obviously doesn’t exist on the internet but we can trick our computer to resolve it anyway. Note that to edit the file you have to have sudo permissions, e.g. sudo nano /etc/hosts.
# /etc/hosts

# ...
# Append this at the end
127.0.0.1 my-cool-web.com
After editing and saving the file, the DNS should be configured and you can try to open the address https://my-cool-web.com in your browser.
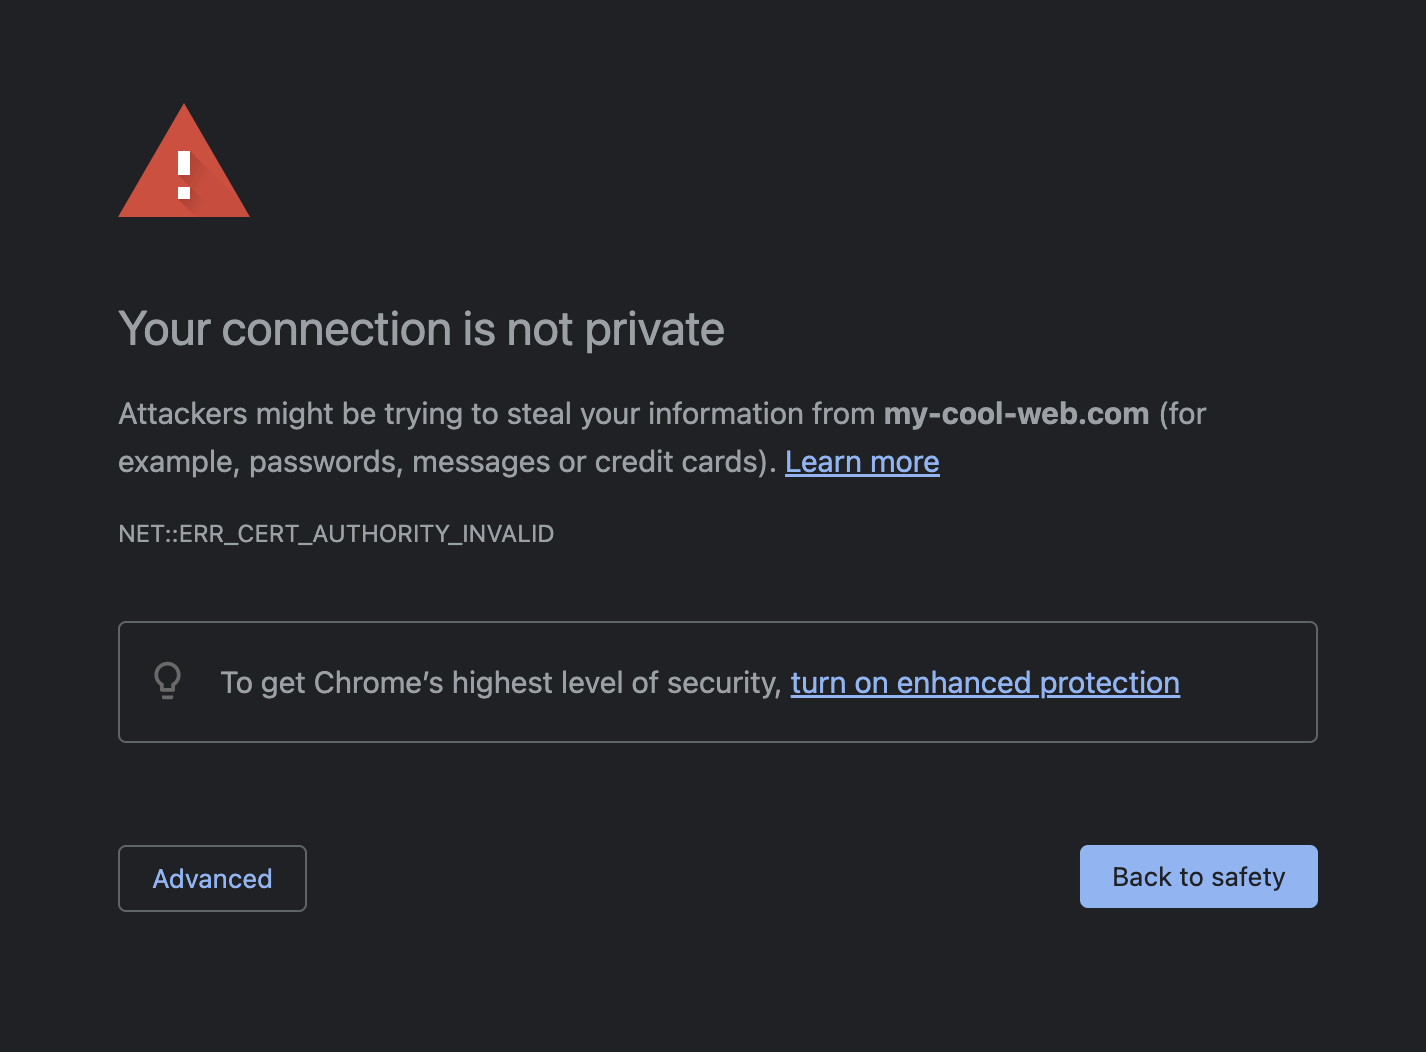
After submitting the warning dialog you should be able to see the welcome message again, now on the custom domain.
Add a subdomain
Let’s say we wanted to add a subdomain subdomain.my-cool-web.com. In order to do this we are going to update the Nginx configuration so it knows where and how to process the requests. We can do this by adding another server directive. Notice that we added a new directive server_name describing the actual domain the server should handle. The rest is almost the same, we just update the port the server should forward to for the subdomain.
server {
server_name my-cool-web.com;
listen 443 ssl;
include /etc/nginx/conf.d/ssl.conf;
location / {
proxy_pass http://host.docker.internal:3000;
proxy_set_header Host $host;
proxy_set_header X-Real-IP $remote_addr;
proxy_set_header X-Forwarded-For $proxy_add_x_forwarded_for;
proxy_set_header X-Forwarded-Proto $scheme;
}
}
server {
server_name subdomain.my-cool-web.com;
listen 443 ssl;
include /etc/nginx/conf.d/ssl.conf;
location / {
proxy_pass http://host.docker.internal:4000;
proxy_set_header Host $host;
proxy_set_header X-Real-IP $remote_addr;
proxy_set_header X-Forwarded-For $proxy_add_x_forwarded_for;
proxy_set_header X-Forwarded-Proto $scheme;
}
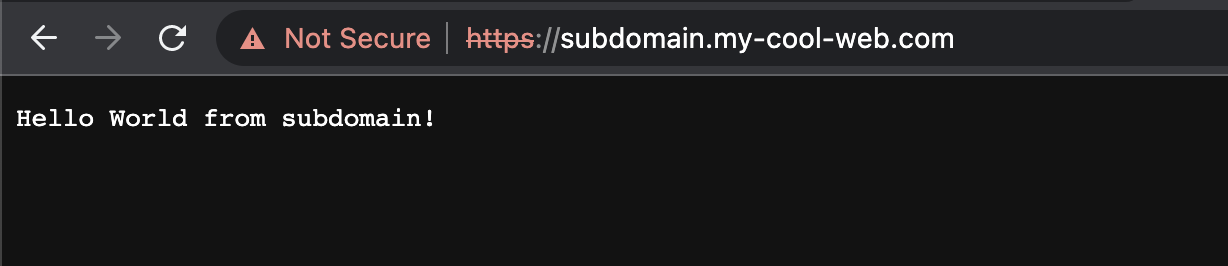
}If we’re not using some more sophisticated DNS server, we have to add the new URL to /etc/hosts file again, as it doesn’t support wildcards.
# /etc/hosts

127.0.0.1 my-cool-web.com
127.0.0.1 subdomain.my-cool-web.com
To actually see a difference we can create a second Node.js server, which listens on port 4000 and shows a different message.
// subdomain.js

const http = require('http')

const server = http.createServer((req, res) => {
  res.writeHead(200)
  res.end('Hello World from subdomain!')
})

server.listen(4000)
console.log('Listening on 127.0.0.1:4000')
Make sure to rebuild the Docker image again (as we have changed the configuration), and run both Node.js scripts. Don’t forget to expose the newly added port 4000 in your Dockerfile!
Now, when you open subdomain.my-cool-web.com you should see your subdomain message 🎉
And that is how you can make HTTPS work locally.
You can find all the code on Github.