I have an old Mac Mini that I wanted to use to run RetroPie and launch it automatically after startup. But the question was how to turn it off. I didn’t want to yank the power or force‑shut the whole OS, but I also don’t have a keyboard and a mouse connected to it. I wanted to have a graceful way to trigger a clean shutdown so the system could close everything properly.
That got me thinking: what if I could build a small device with a physical button that talks to the computer over USB and tells it “shut down gracefully”? I started researching how that could work, and that’s when I discovered the HID protocol.
What is USB HID?
USB HID stands for Human Interface Device. It’s a standard USB device class that the OS already knows how to talk to. Keyboards, mice, gamepads, and similar gadgets usually identify themselves as HID, so they work as soon as you plug them in—no custom driver needed. The host (your computer) learns what the device is and how to read its data from the descriptors the device sends when it’s plugged in. After that, the device sends small packets called reports (for example, “key A pressed” or “mouse moved”) over a dedicated channel, and the OS delivers them to the right place (keyboard input, mouse cursor, etc.).
And because it’s a standard class, you get plug-and-play on Windows, macOS, and Linux. No need to write a kernel driver or any low-level code; we just implement the protocol, and the OS handles the rest. For a custom button device, media keys, or a small control panel, HID is a natural fit: the computer sees our device as a normal input device, and we can send custom reports as long as our firmware and host app agree on the format.
Other USB classes
However, the USB standard is much more extensive. USB defines several device classes, each for a different kind of device. HID is only one of those. Other common classes include CDC (Communications Device Class) for serial-style links (e.g. Arduino’s USB serial, modem dongles); Mass Storage for drives and card readers; Audio for mics, speakers, and headsets; Video for webcams and capture devices; and PTP/MTP for cameras and phones when you transfer photos. The host uses the class (and descriptors) to know how to communicate with the device.
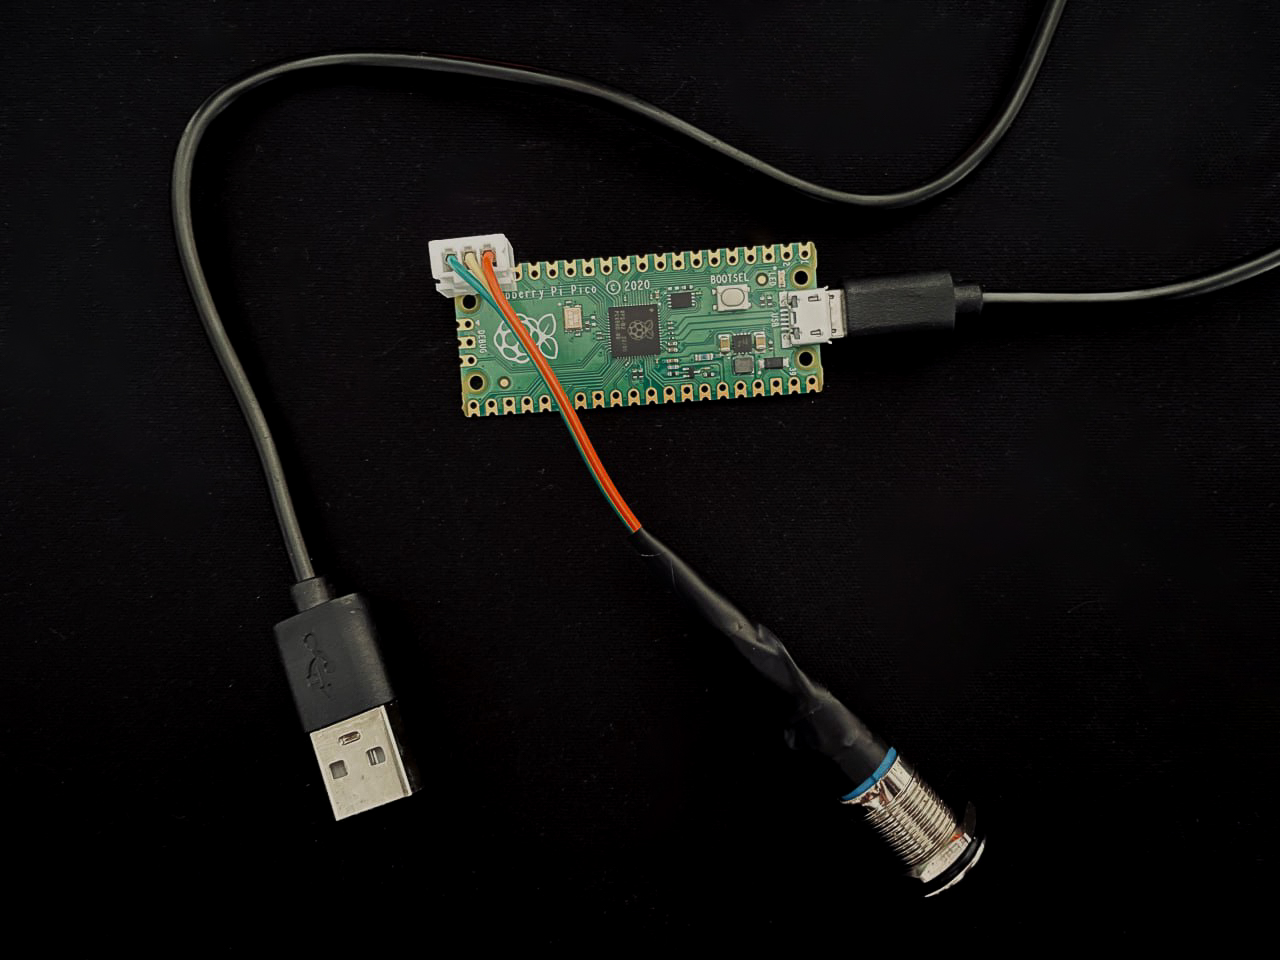
So what are we building?
The hardware side is a Raspberry Pi Pico running firmware written in TinyGo.
If you know Go, TinyGo is the same language, but the compiler targets microcontrollers and small systems instead of your usual OS.
Regular Go assumes an operating system: goroutines, a runtime, and system calls. TinyGo compiles to bare metal (or a minimal runtime) so the binary runs directly on the chip—with much lower memory use and no OS in the way.
I wasn’t happy with the “keyboard HID” or a fixed set of keys. I wanted to define and send my custom HID events with a payload I’d choose. This would also help me better understand the whole flow.
The idea was that the firmware on the Pico would detect the button press (short, double, long), turn it into a HID report with my custom event codes, and send it over USB.
On the computer, a host application (regular Go, this time on macOS or Linux) opens the device, listens for those reports, and acts upon them by running Lua hooks. So one press might trigger “shut down RetroPie gracefully,” another might do something else; the host script (Lua) decides. That way, the device stays simple and generic, and all the “what happens when” logic lives in scripts you can change without reflashing the Pico or recompiling the host code. Neat!
How USB & HID actually work
When you plug the Pico in, the host and device go through a defined sequence of calls. Fortunately, TinyGo ships with a USB stack and HID support for the Pico, so we don’t have to implement the entire USB protocol ourselves. Nevertheless, it helps to know what’s going on at least on a high level. So, after a USB is connected, the following happens:
- The host asks “Who are you?”, and the device responds with a device descriptor that includes vendor ID (VID), product ID (PID), device class, and similar information.
- The host then asks what interfaces the device has. The device sends a configuration descriptor that says, e.g., “I have a CDC (serial) interface and one HID interface.” That’s defined in TinyGo’s configuration and interface descriptors.
- For the HID interface, the host requests the HID report descriptor. That’s a small binary blob that describes the exact format of the reports: how many bytes, which report ID, and what each field means (e.g., keyboard vs. consumer).
From then on, every report the device sends must match that format. In TinyGo, the composite CDC+HID report descriptor is located in hid.go. That’s where report ID 1 (mouse), 2 (keyboard), and 3 (consumer) are defined.
- Next, the host selects a configuration (e.g., “use this CDC + HID setup”). After that, the HID interface has an interrupt IN endpoint (device → host) and, if the descriptor declared output reports, an interrupt OUT endpoint (host → device). The device is ready to send and receive reports.
- Once the configuration is set, we just build report bytes and send them to the IN endpoint. The host polls that endpoint and reads the latest report. For host → device (e.g., LED control), the host writes to the OUT endpoint and the firmware receives those bytes in a callback.
TinyGo’s machine/usb/hid/keyboard package exposes a simple API for using HID. For example, to send the letter “A” when the user presses a button, we could use the following program:
package main

import (
	"time"
	"machine/usb/hid/keyboard"
)

func main() {
	kb := keyboard.Port()
	time.Sleep(2 * time.Second)  // give the host time to enumerate

	// One key press: down then up
	kb.Press(keyboard.KeyA)
}
Here, TinyGo’s default HID descriptor and the keyboard package do the work: they build the modifier + key bytes, report ID, and send them on the IN endpoint. The host sees a normal keyboard and types “A”.
In this project, however, I wanted to send custom events and have full control over the payload (e.g., short/double/long press), so we will use the consumer report and our own report format instead of the keyboard API.
Firmware
On the Pico, we have a single non-blocking loop that repeatedly checks the button and handles USB. We don’t use hardware interrupts for the button; instead, we poll it every few milliseconds. A small state machine in the button package tracks press and release times and classifies each completed gesture as a short, double, or long press. As soon as a press is detected, we turn it into a custom HID event and send it to the host.
Sending events as HID reports (device → host)
We use the consumer report type (report ID 3) from TinyGo’s default descriptor. Each of our events is a single 3-byte report:
- Byte 0 — Report ID:
0x03(consumer).
- Bytes 1–2 — Payload: one 16-bit value in little-endian order (low byte first). We use it as an “event code”: e.g.
0x0001= short press,0x0002= double press,0x0003= long press. The host reads the same descriptor, so it knows report ID 3 carries one 16-bit usage and can map those codes to actions (e.g., graceful shutdown or Lua hooks).
So our HID events are structured as [report_id, usage_lo, usage_hi]. The descriptor has already told the host “report ID 3 = one 16-bit consumer usage,” so we only need to fill those three bytes and send them.
Receiving reports from the host and controlling the LED (host → device)
HID can be two-way, which means the host can also send output reports to the device. TinyGo’s default descriptor defines report ID 2 (keyboard) with a 1-byte output field intended for keyboard LEDs. We can reuse that single byte to drive our LED. If the host sends a report [0x02, cmd], we interpret cmd as “LED on,” “LED off,” or “blink.”
In the main loop, we call GetReceivedReport() to check whether the host has sent an output report so we can handle it.
Main code loop
After initialising the button, LED, HID, and waiting for the host to enumerate USB, we run a loop that:
- Handles host → device: Calls
GetReceivedReport(). If the host sent an output report (e.g., report ID 2 with one byte), we interpret it and set the LED (on, off, or blink).
- Drives the LED: If we’re in “blink until ready” mode, we blink the LED each iteration; once the host has sent “LED on,” we keep the LED as configured by the host.
- Polls the button: Calls
button.Poll(). If it returns a completed short/double/long press, we send the matching usage in a consumer report.
A simplified version of that flow and the custom reports could look like this:
// Simplified: one loop that polls the button, sends custom HID reports,
// and handles host reports for the LED.
func main() {
	button.Init()
	led.Init()
	usbHid := hid.Init()
	waitForUSBReady()

	for {
		// Host → device: e.g. report ID 2 with 1 byte → set LED on/off/blink
		if reportID, payload, ok := usbHid.GetReceivedReport(); ok {
			if reportID == protocol.HIDReportIDKeyboard && len(payload) >= 1 {
				switch payload[0] {
				case protocol.LedOn:
					led.On()
				case protocol.LedBlinkOn:
					led.BlinkOn()
				case protocol.LedOff:
					led.Off()
				}
			}
		}

		if led.ShouldBlink() {
			led.BlinkLED()
		}

		// Device → host: on short/double/long press, send one consumer report
		if pressType, ok := button.Poll(); ok {
			usbHid.SendConsumerReport(uint16(pressType))
			usbHid.Flush()
		}

		time.Sleep(2 * time.Millisecond)
	}
}
The consumer report we send is three bytes that match the descriptor:
// Our consumer report (device → host): [report_id, usage_lo, usage_hi]
// e.g. short press → [0x03, 0x01, 0x00]
report[0] = 0x03             // report ID 3 (consumer)
report[1] = byte(usage)       // 16-bit usage, low byte
report[2] = byte(usage >> 8)  // high byte
// then send on the HID IN endpoint (Flush() does that)
HID Listener (host application)
HID listener is a small utility written in Go that connects to the Raspberry Pi Pico over USB HID, listens for the custom button reports, decodes them, and runs user-defined Lua hooks for each press type.
Connecting and listening
We use the bearsh/hid library to enumerate HID devices by VID/PID and open the right interface (we prefer the consumer interface, so we receive report ID 3). Once the device is open, it starts a goroutine that reads HID reports in a loop.
Before entering the loop, we configure hooks (load the Lua script and register LED helpers) and send a “ready” report to the firmware so the Pico can turn the LED solid and show that the host is connected.
Decoding the payload and running hooks
Each report we receive is 3 bytes: [report_id, usage_lo, usage_hi]. We check that the first byte is our consumer report ID (0x03), then reconstruct the 16-bit usage as uint16(usage_lo) | uint16(usage_hi)<<8 (little-endian). That value is one of the button press types (e.g. 0x0001 = short). We pass it to the hooks layer, which calls the corresponding Lua function if the user defined it (e.g.onSinglePress()).
User-defined logic in Lua
The main benefit of using a Lua script is that the business logic can be defined freely by the user and changed anytime without needing to recompile the Go binary. The user puts a script at a fixed path (~/hid_listener.lua) and defines the three optional functions. In that file, they can run shell commands, talk to other tools, or trigger a graceful shutdown. The Go binary also exposes functions to control the Pico LED (e.g., led_on()) from Lua. If you want to learn more about how this works, I’ve written an article where I go into details.
A simplified version of the flow then looks like this:
// Connect to the Pico by VID/PID and open the HID device
rpiPico, err := hid.Connect(RPI_PICO_VID, RPI_PICO_PID)
if err != nil {
	log.Fatalf("Failed to connect: %v", err)
}
defer rpiPico.Close()

// Set up Lua: load script, register led_on/led_off/led_blink, get onSinglePress/onDoublePress/onLongPress
hooks.Configure(rpiPico)

// Tell the firmware we're ready (LED goes solid)
_ = hid.SendData(rpiPico, []byte{protocol.HIDReportIDKeyboard, protocol.LedOn})

// Start reading HID reports in the background
hidReports := hid.ListenForHIDReports(rpiPico)

for report := range hidReports {
	// Decode: [0x03, usage_lo, usage_hi] → 16-bit press type
	pressType, err := hid.ValidateHIDReport(report)
	if err != nil {
		continue
	}
	// Run the user's Lua hook for this press type
	hooks.HandleHIDEvent(pressType)
}
Example Lua script
In ~/hid_listener.lua the user can define only the handlers they care about, in this case, enable LED blinking and shut down the host:
-- ~/hid_listener.lua

function onSinglePress()
  -- e.g. trigger a graceful shutdown of the host
  led_blink()
  os.execute("shutdown -h now")
end
We’ve walked through the full path from idea to working setup: a Raspberry Pi Pico running TinyGo firmware that turns button presses into custom HID reports, and a host app that connects over USB, decodes those reports, and runs Lua hooks so you can define what each press does. If you found this article interesting and are curious about the details, you can find the full code on my Github.